
- The Event ID 41 Windows 11 error is a system error that can arise because of power settings and irregularities, system file corruption, overclocking, and third-party software conflicts.
- Disabling a few power options might fix the kernel-power 41 error for some users.
- Some of Windows 11’s built-in troubleshooting tools might also fix the Event 41 error.
XINSTALL BY CLICKING THE DOWNLOAD FILE
Event ID 41 is a PC error users have reported for both Windows 11 and 10. That issue is also known as the Kernel-Power 41 error. When that error occurs, Windows randomly restarts without properly shutting down first. One user’s forum post described that issue as follows:
I have gotten between 5-10 systems crashes since January 2 when I got the PC. The PC restarts entirely, no warning, no BSOD, and is back up and running in around 5 seconds. It has happened only while playing games (once during Madden 22, others playing Minecraft).
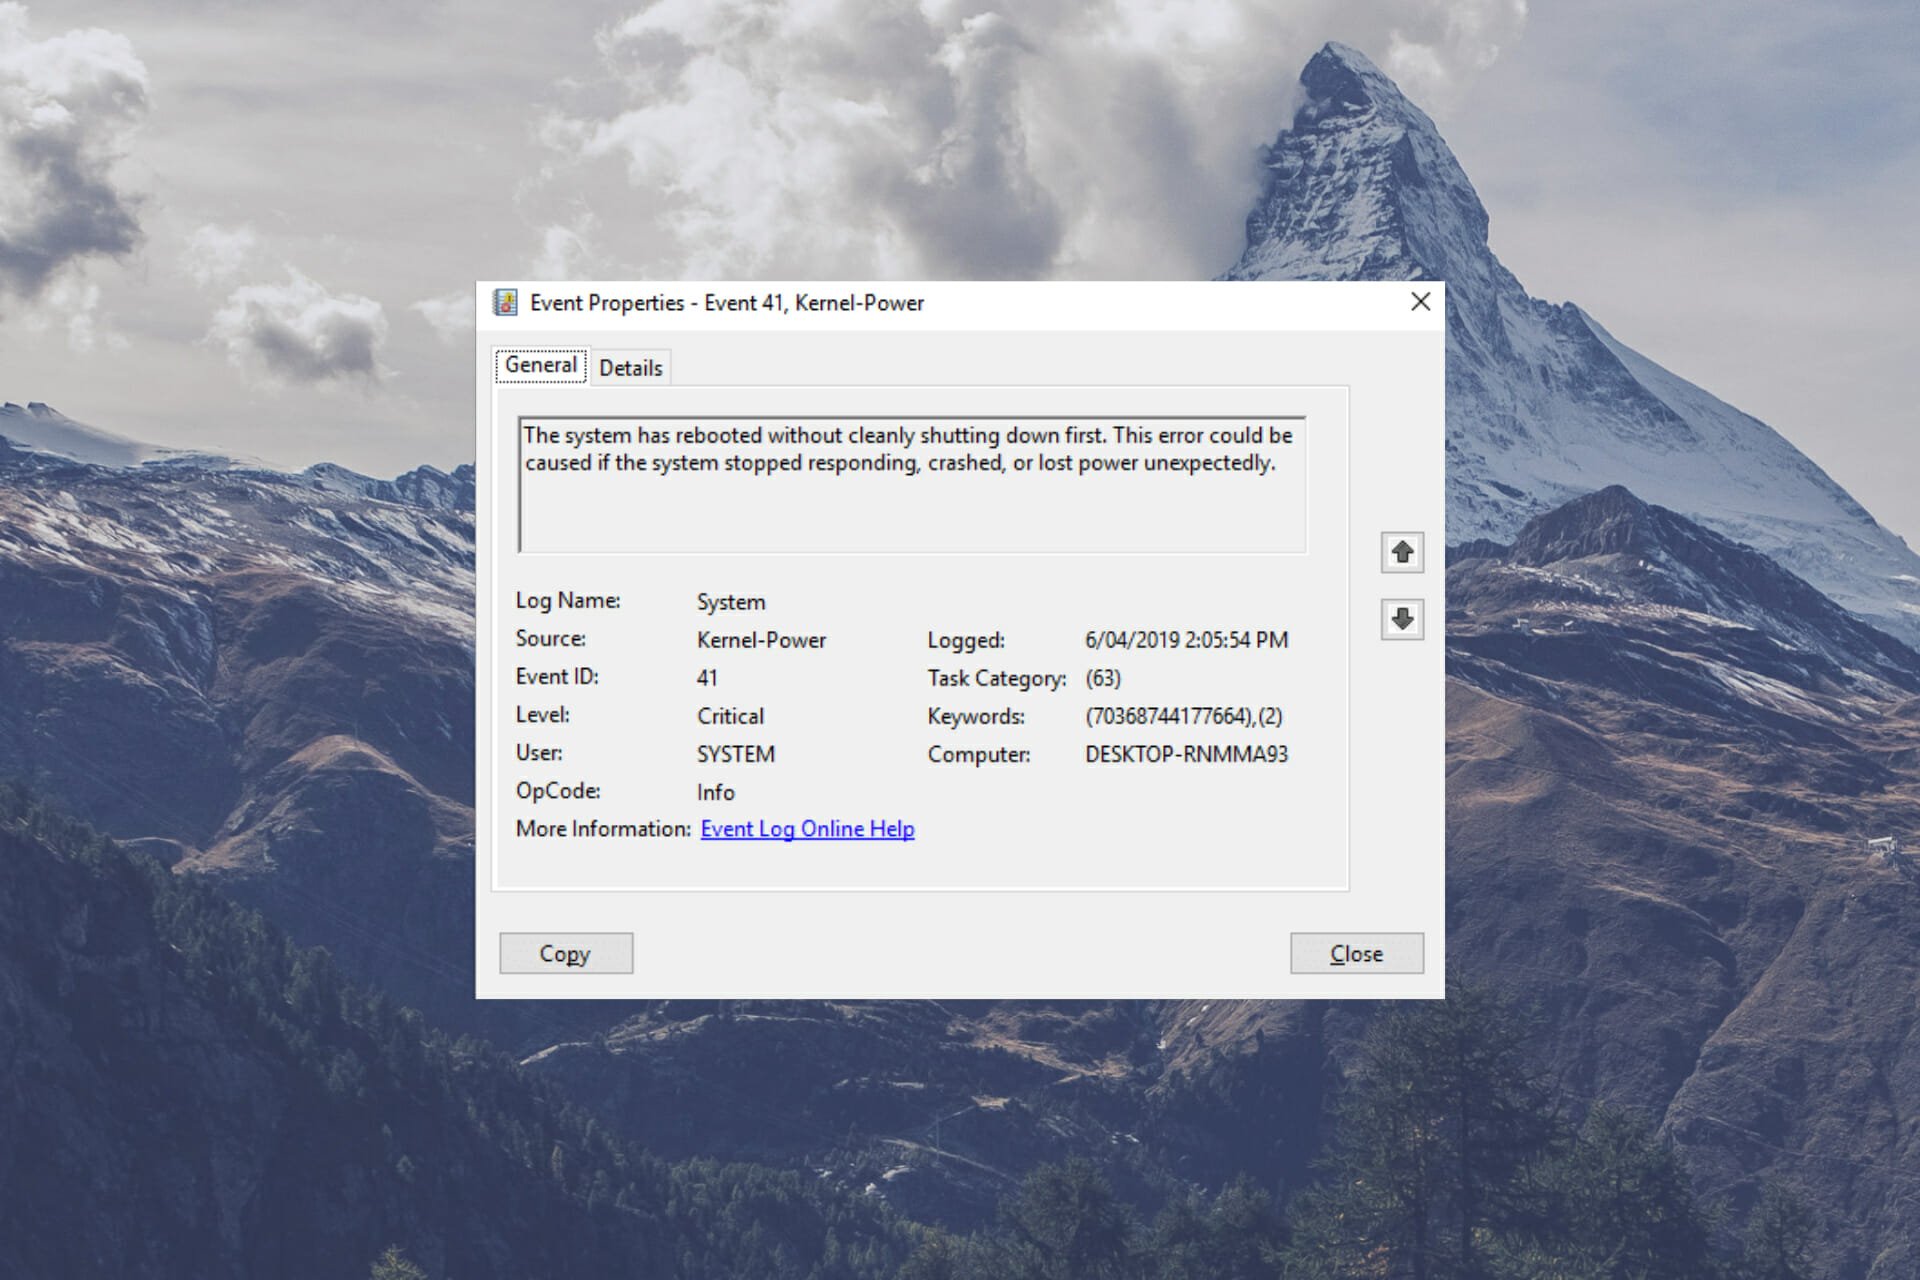
Event Viewer logs that error as a critical one with a 41 ID and description that says, The system has rebooted without cleanly shutting down first. There are a few alternative scenarios in which the error can arise, and some users have also reported it as a blue screen (stop code) error.
Do you need to resolve the Event ID 41 Windows 11 error? If so, you might be able to fix that issue by applying some of the potential resolutions for it outlined below.
What causes Event ID 41 in Windows 11?
As the Event ID 41 error can arise under various circumstances, it has quite a few potential causes. It can be due to certain Windows 11 power settings. Adjusting such settings can resolve the error in such a scenario.
Conflicting third-party software can be another factor behind the Event ID 41 Windows 11. Windows antivirus or customization apps can feasibly have some impact on the error’s kernel-power source. Removing, or at least disabling, such conflicting software could fix the issue for some users.
This issue might arise because of corrupted system files. In which case, Windows 11’s System File Checker and recovery tools can fix it.
The Event ID 41 error can also be a hardware-related issue. For example, the error might pertain to your PC’s power supply unit. Or your PC could have a faulty RAM module.
How can I fix the Event ID 41 error on Windows 11?
1. Check for Windows 11 updates
- Open Windows 11’s Start menu, and click the Settings shortcut there.

- Select Windows Update in Settings.

- Click the Check for updates option.

- Press the Install now button if there are available updates.
- It’s also recommended that you check the optional updates section. To do so, click Advanced options on the Windows Update tab.

- Select the Optional updates navigation option.

- Click the checkboxes for optional updates there. Then press the Download and install button.

2. Run the Power troubleshooter
- Open Settings from the Start menu.
- Select Troubleshoot, and choose Other trouble-shooters in Settings.

- Click the Run button for the Power troubleshooter.

- If the Power troubleshooter suggests a resolution, click the Apply this fix option.
3. Adjust power settings
- Bring up the Start menu, and click inside its search box.
- Input Edit power plan in the search text box.
- Select Edit power plan to open that Control Panel applet.

- Click the Change advanced power settings option shown directly below.

- Double-click Hard disk in the Power Options window to expand that setting.
- Select Never in the Setting (Minutes) box.

- Next, double-click the Sleep option. Then click Sleep after to expand that setting.
- Click the down arrow for Settings (Minute) box to select Never.
- Press the Apply button to save the new power options.

- Click Power on the Start menu. Then select the Restart option.

4. Disable the Fast Startup feature
- Right-click the Start button’s taskbar icon and select Run on the Power User menu.
- Type this Run command in the Open box and click OK:
Control Panel
- Click the Control Panel’s View by drop-down menu to choose Small icons.

- Select Power Options to view that applet.
- Click Choose what the power button does to open further options.

- Then click the Change settings that are currently unavailable option.

- Deselect the checkbox for the Turn on fast startup option.

- Press the Save changes button to apply.
5. Run a system file scan
- Enter the keyword Command Prompt in the Start menu’s search box.
- Select Command Prompt’s Run as administrator option to open it with elevated permissions.

- Type in the following Deployment Image Servicing command and hit Enter:
DISM.exe /Online /Cleanup-image /Restorehealth
- Input this system file scan command and press Return:
sfc /scannow
- Wait for the SFC tool to complete its scanning and display an outcome.
6. Undo Overclocking
Have you done any kind of overclocking on your PC? If so, that overclocking might be the reason you need to fix the Event ID 41 Windows 11 error. Undoing the overclocking you’ve applied could fix the issue.

You can undo overclocking via the UEFI firmware settings in the BIOS. Select Performance, and choose Overclocking there to reset overclocked values to their defaults.
Then save the BIOS changes, and restart your PC. If you’re not sure, feel free to find out how to enter the BIOS.
7. Clean Boot Windows 11
- Open the Run command window.
- To open the System Configuration Window, type this text into Run and click OK:
msconfig - Click Selective Startup radio button, and deselect the checkbox for the Load startup items setting.

- Select Hide all Microsoft services on the Services tab.
- Press the Disable all button to uncheck the checkboxes for remaining services.

- Click the Apply option to save the new boot settings.

- Select OK to exit System Configuration, and click Restart on the dialog box that opens.


NOTE
If this resolution resolves the event ID 41 error, you’ll need to identify what disabled startup program or service was causing the issue if you restore the original boot configuration. You can restore standard boot settings by selecting the Load startup items and Enable all options in MSConfig.
8. Update the BIOS
If your PC has an old BIOS (Basic Input Output System) version, updating it might fix the Event ID 41 error.
We recommended you read your motherboard’s instruction manual for specific guidelines about how to upgrade its BIOS. Also, check out how to easily update your BIOS for further details.

9. Reset Windows 11
- Open the Settings window, and click Recovery on the System tab.

- Click the Reset PC recovery option.

- Choose the Keep my files option to preserve user files.

- Select Local reinstall or Cloud download according to your preference.

- Click Next > Reset to initiate a repair install.

NOTE
Resetting Windows 11 will restore it to original factory settings. Software that didn’t come pre-installed on your desktop or laptop will not be installed after resetting the platform. So, you’ll probably need to reinstall some software after the reset.
How can I check if an Event ID 41 error has occurred?
After Windows randomly restarts, have a look through Event Viewer to see if it has logged an Event ID 41 error. Event Viewer is a Windows 11 utility that logs system events.
When Kernel-Power 41 error occurs, that utility will include an Event 41 error log for it. You can check Event Viewer as follows.
- Press the Windows key + X hotkey for the Power User menu.
- Select Event Viewer on the menu.

- Then click Windows Logs, and choose System in Event Viewer.

- Select the Find option.

- Type Event 41 in the Find box.
- Press the Find Next button.

- Alternatively, scroll through the Event ID system logs within Event Viewer to find Event 41.
If Event Viewer shows Event 41 error has occurred on your PC, try troubleshooting it with the potential resolutions above. They’re some of the most probable Windows 11 fixes for that issue.
If those potential fixes aren’t enough, there might be a hardware issue on your PC. In such a scenario, you might need to check for faulty hardware and even replace certain components. To apply potential hardware fixes, consider contacting a reputable PC repair service for further advice.
You can discuss the Event 41 error in the comments section below. If you’ve fixed the same issue with a method not specified above, feel free to share it there. You can also add any questions about the Event 41 error below.

Start a conversation