
- Learn how to increase VRAM on Windows 10 to gain the benefits of higher image resolutions.
- Firstly, make sure to follow our quick steps and find out how much VRAM you truly have.
- To achieve your goal, try to enter BIOS and complete the procedure detailed below.
- Rest assured that using Registry Edit is another simple way to increase VRAM on Windows 10.
XINSTALL BY CLICKING THE DOWNLOAD FILE
Among your Windows 10 PC components, there is a very important one called RAM. It’s also commonly known as the computer’s memory because it’s constantly used by the processor to store data.
The main reason behind this is to make things run faster and smoother.
Think of it like this: every buffer for a graphically intense app, every program that you launch from the hard drive, every OS command, it’s picked up by the processor and loaded onto RAM.
The next time you will run the same task, it will be much faster because the processor stored it in RAM.
Speaking of graphically intense programs, they are processed in a different manner because they are too resource-hungry. That’s where VRAM or Video RAM comes in.
VRAM is what GPUs or graphics cards are using for processing high-resolution content and complex textures. Be it a 4k video, some rendering, or the latest and greatest game, you’ll need a good GPU with enough VRAM to run them.
If you wish to increase the dedicated video RAM in Windows 10, first you’ll have to establish how much VRAM you already have.
The best way is, obviously, to change your GPU with a more powerful one. If you don’t want to do that, then you can increase your current allocation of dedicated video RAM through BIOS or Registry Editor.
How do I allocate more VRAM in Windows 10?
- Increase dedicated VRAM via BIOS
- Increase dedicated VRAM via Registry Editor (integrated Intel GPU’s)
- Upgrade to a Dedicated GPU
1. Increase dedicated VRAM via BIOS
Find out how much VRAM you have
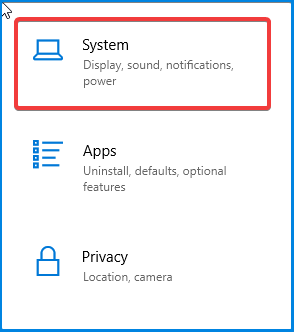
- Go to Start > Settings > System.
- Under the Display section, scroll down until you see highlighted in blue Advanced Display Settings. Click on it.

- At the bottom of the new window, click on Display adapter proprieties for your display.
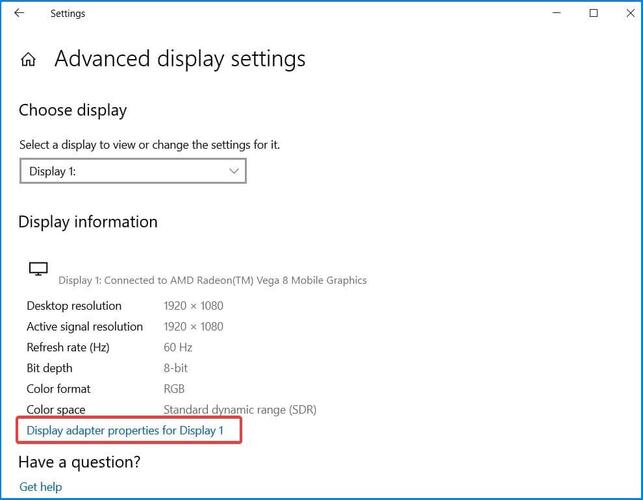
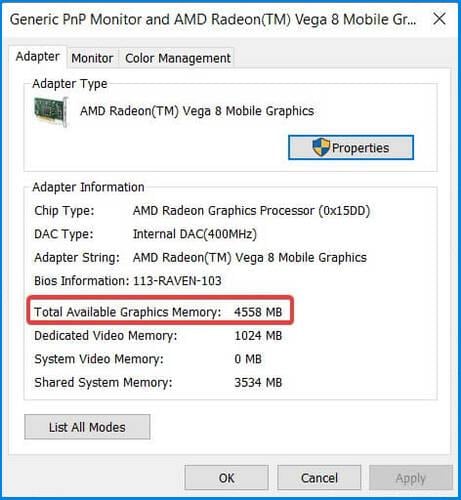
- In the new window, under Adapter, you will see your Total Available Graphics Memory.
First and foremost, before you try increasing the amount of RAM, you’ll have to know exactly how much VRAM is on your graphics card. To find out, follow the aforementioned steps.
- Restart your PC and enter BIOS. While restarting, press the BIOS key repeatedly – usually F2, F5, F8, or Del key.
- Once you entered BIOS, look for Advanced/Advanced Options or anything similar to that.
- Again, look for VGA Share Memory Size, Graphics Settings, Video Settings, or anything like that.
- Choose Pre-Allocated VRAM and change the value to one that best fits your needs.
- Save changes and restart PC.
More often than not, the default value is 64M or 128M. You can choose the 256M or 512M to increase the VRAM.
Remember that not all BIOS settings look alike, and your BIOS key or BIOS options might differ. Check the manufacturer’s manual to see what key you need to press to enter BIOS.
This is the most optimal method to reallocate VRAM. Because this has a good chance of success, it’s the first thing that you should try. However, you might be wondering if there is an alternative to the BIOS and we cannot blame you for not wanting to take any chances. Fortunately, there is.
How to increase Dedicated Video Memory without BIOS
- Use the dedicated bar to search for This PC app.
- From the menu, select Properties.

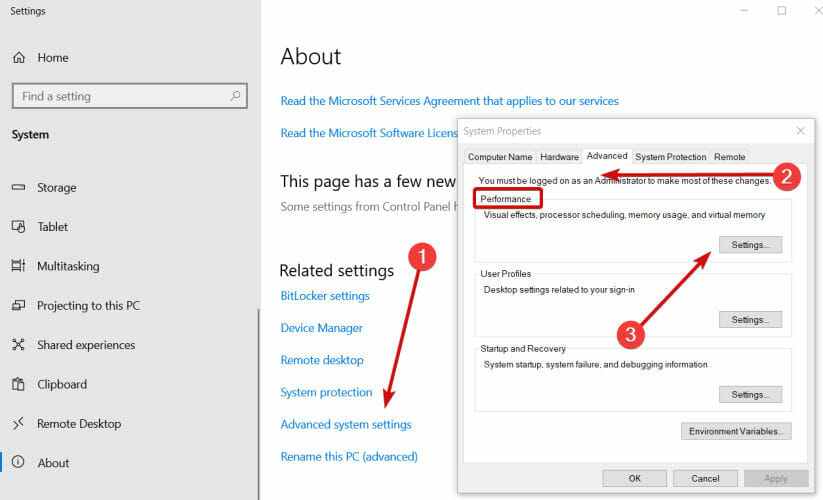
- Now, locate the Advanced system settings link under the Related settings section.
- In the System Properties window, go to (or stay on) the Advanced tab.
- Next, click on the Settings button under Performance.
- In the following screen, head over to the Advanced tab and click on Change.
- Make sure you remove the check preceding the option Automatically manage paging file size for all drives and enable Custom size (below it) instead.

- Finally, set the Initial and Maximum size values as per your choosing and hit the OK button to apply the modifications.
2. Increase dedicated VRAM via Registry Editor (integrated Intel GPU’s)
- Press Windows key + R to open Run, and type regedit. Hit Enter.

- Navigate to
HKEY_LOCAL_MACHINESoftwareIntel
- In the side-panel, right-click the Intel folder and select New > Key, then name it GMM.
- In the side-panel, under Intel, a new GMM folder should appear. With the GMM folder selected, in the right section on an empty space right-click and create a New > Dword (32-bit).
- Name it DedicatedSegmentSize.
- Now double-click the DedicatedSegmentSize, under Base choose Decimal.
- Under Value data type a number between 0 and 512. That’s the amount of RAM you can allocate in megabytes, and it should appear in Adapter Proprieties.
- Save and Restart PC.
Usually, the system automatically adjusts the amount of VRAM needed by any application at any given time.
In some cases, when you need just a little bit more to run an app or a game, you can fake a VRAM increase through Registry Editor.
3. Upgrade to a Dedicated GPU
Increasing the VRAM in Windows 10 through BIOS or Registry Editor is a nifty solution that may come in handy sometimes, but if you are looking for real horsepower under the hood, then we suggest buying a dedicated graphics card.
If you’re rocking a dedicated GPU, even an older one, it’s way more likely to be satisfied with the result over any brand-new integrated one.
A dedicated GPU has way more VRAM and computing power overall, which helps if you’re planning to play games or edit videos on your computer.
Integrated GPUs are good for work, but they don’t hold up well when rendering higher resolutions and textures.
You will find yourself experiencing FPS drops most of the time during gameplay, and your video editors will take ages to load your meshes, especially when 3D modeling.
⇒ Check out this great dedicated GPU
What tasks are you throwing at your GPU? Gaming? Or some video editing, perhaps? Tell us in the comments section below along with any other questions you may have.

Frequently Asked Questions
There are 10 comments