
- Windows 11’s Search indexing was turned off error arises when the service fails to run.
- To fix this issue, you might need to turn indexing back on by enabling the required services.
- When the indexing is not running in Windows 11, the index might need rebuilding.
- Some troubleshooters will also come in handy for solving this problem for good.
XINSTALL BY CLICKING THE DOWNLOAD FILE
Windows 11’s Search tool isn’t much different from the one in Windows 10. That utility retains the same search indexing from the previous OS. It’s undoubtedly one of that platform’s most important tools.
However, Windows search tool issues can sometimes arise. The Search indexing was turned off error is one some users have informed us about.
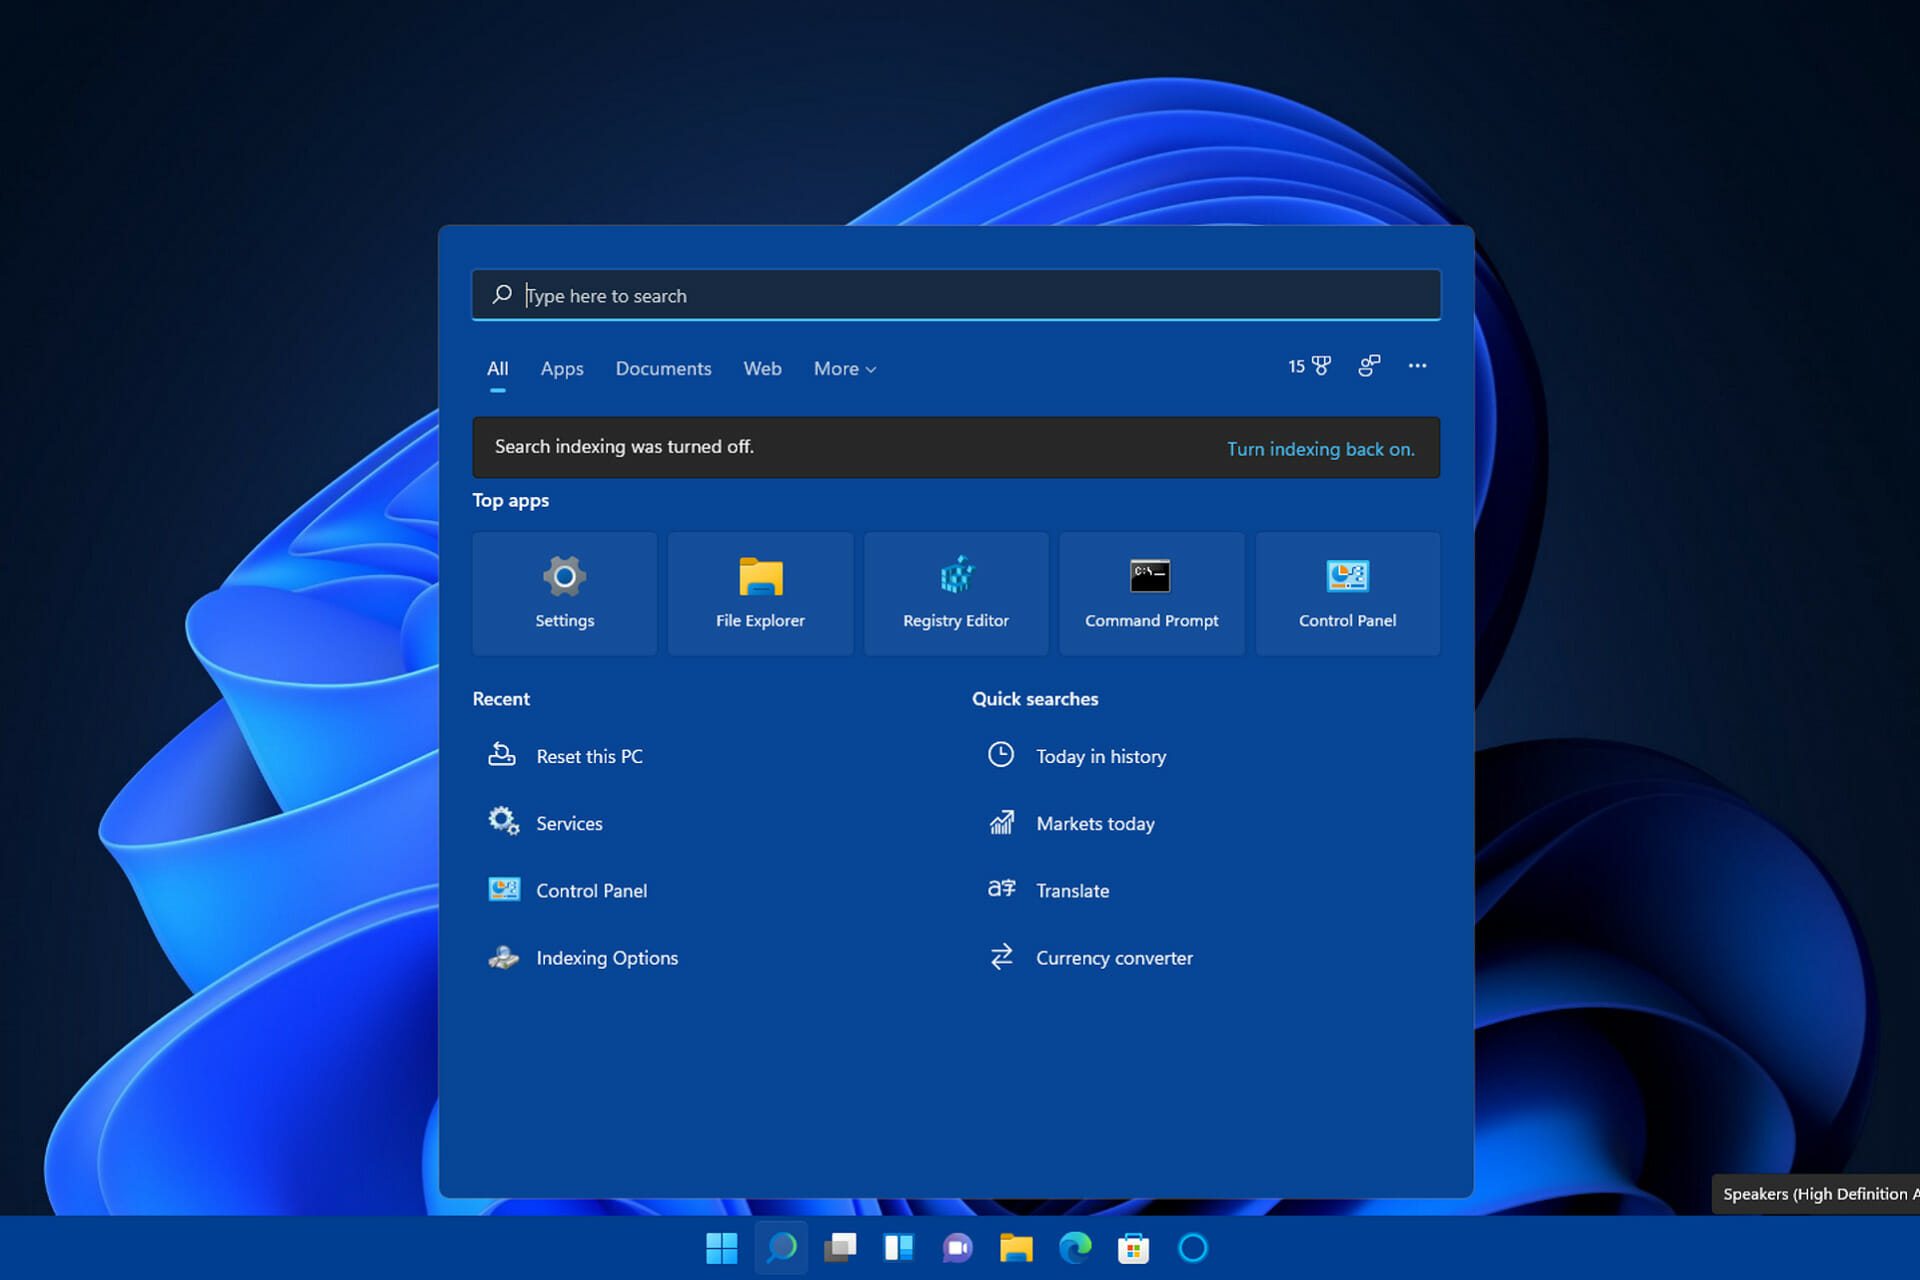
They claim to get this message when searching on Start menu. When they click on Turn On Indexing, they receive a message saying: Indexing is not running.
So, users see this error message in the search box even when they haven’t disabled that feature themselves. Consequently, search indexing doesn’t work, which can have a notable impact on the search tool.

What does the Windows Search indexer do?
The Windows indexer is a service that indexes files for the search utility. To be more precise, it indexes files’ properties such as titles, contents, and paths. By doing so, it makes your file searching much faster and more efficient.
The same service is also important for built-in apps. For example, apps like File Explorer, Groove, and Photos track file changes with the index. Edge can display browsing history results in its URL bar thanks to the index feature.
So, your Windows searches won’t be quite the same because of the Search indexing was turned off error. It’s not a completely essential service, but indexing files does make a big difference for file searching. This is how you can resolve that issue.
How can I fix the Search indexing was turned off error?
1. Make sure the Windows Search service is enabled
- Right-click the Start menu’s taskbar button to open a menu with various shortcuts on it.
- Click Run on the menu.

- Type this Run command in the Open box and click OK:
services.msc - Next, double-click the Windows Search service.
- Select Automatic on the Startup type drop-down menu if the service is disabled.

- Then click the Apply button.
- Thereafter, press the Start button.
- Click OK to exit the window.
- Repeat the steps above to enable and start the Background Tasks Infrastructure Service and Remote Procedure Call services if required.
- Restart Windows after enabling those services.

NOTE
If Windows Service is already enabled and running, try right-clicking that service and select the Restart option for it instead.
2. Run the Search and Indexing troubleshooter
- Open the Start menu.
- Select Settings on that menu.

- Next, click Troubleshoot on the System tab.

- Select Other trouble-shooters to proceed.

- Click the Run button for the Search and Indexing troubleshooter.

- Then select My problem isn’t listed above option in the troubleshooter, and click the Next button.

- Enter a description for the issue in the text box, and click Next to continue.
3. Rebuild the search index
- Open the Run accessory as covered within the first couple of steps in resolution one.
- Now type this text in the Open box:
Control Panel - Click OK to bring up the Control Panel.
- Select Large icons on the View by drop-down menu.

- Then click Indexing Options to open that Control Panel applet.
- Press the Advanced button.

- Then click the Rebuild option.

- Click OK to confirm.
4. Clear the TxR folder
- Press the File Explorer taskbar button.

- Click the See more button to bring up the menu that you can see below:

- Select Options on that menu.
- Click the View tab on the Folder Options window.
- Select the Show hidden radio button on that tab.

- Press the Apply button to save the selected settings.
- Then select the OK option.
- Open this folder path in File Explorer:
C:windowssystem32configTxR - Select all the files in the TxR folder with BLF and REGTRANS-MS extensions.
- Finally, press the Delete button.

5. Restore Windows 11 to a previous date
NOTE
Restoring Windows 11 to a previous time will delete software installed after the restore point’s date. To check what software a restore point removes, you can click the Scan for affected programs button in System Restore.
- Press the Windows key and R at the same to bring up the Run accessory.
- To open System Restore, input this Run command:
rstrui - Then click the OK option.
- Select the Choose different restore point option, if it’s available, and click Next.

- System Restore might include a Show more restore points checkbox. Select that checkbox if you can do so.
- Next, select a restore point date that predates the Search indexing was turned off error on your PC.

- Select Next, then Finish to initiate the system restoration.
6. Reset Windows 11
NOTE
This is a pretty drastic last resort resolution that’s recommended only if nothing else works. You’ll need to reinstall all software that didn’t come preinstalled with your PC after resetting Windows.
- Click Start and then the Settings app.
- Select Recovery on the System tab in Settings.

- Click the Reset PC button.

- Select the Keep my files option.

- Next, select either the Cloud download or Local reinstall option (whichever you prefer).
- Click Reset to provide confirmation.
Who can I contact about fixing the Search indexing was turned off error?
Contact Microsoft’s Windows support service if you need more fixes for the Search indexing was turned off error. Open the Contact Microsoft Support webpage, and click the Get support link there. Then type in a description for the issue, and click Get Help followed by Contact Support.
Or you can discuss the Search indexing was turned off error on Microsoft’s Windows support forum. To post a query there, click the Ask a question link on that forum. Thereafter, enter your question in the forum’s text editor and click Submit.
However, the potential resolutions here will likely fix the Search indexing was turned off error for most Windows 11 users. So, make sure you give them a try first.
You can also change search indexing locations to reduce the Windows indexing service’s system resource utilization when you’ve fixed it. Our guide on how to enable and disable indexing provides further details for modifying index locations.
It might not be entirely essential to fix turned off search indexing. However, there can be no doubt the Windows search utility is somewhat poorer without it. Therefore, it’s best to get the Search indexing was turned off error fixed.
Have you managed to do so? Let us know which solution worked for you in the comments area below.
Start a conversation